No more clicking through dashboards. The Cloud API and CLI went production-ready on March 3rd — here’s the full deployment workflow from zero to live.
Three days ago, the Laravel Cloud API and CLI went generally available. If you’ve been deploying Laravel apps by clicking through web dashboards, pushing to branches and waiting, or writing bespoke deployment scripts — that workflow just got obsolete.
This is the complete guide: install, authenticate, first deployment, environment management, CI/CD integration, and the AI agent angle that makes this genuinely different from any other deployment tool.
What the Cloud CLI Actually Is
The Laravel Cloud CLI is a terminal-first interface to your entire Laravel Cloud infrastructure. Whether you are deploying from your terminal or integrating with a CI/CD pipeline, the CLI gives you full control over your Laravel Cloud account.
The CLI is built directly on top of the Cloud API, giving developers a fast, scriptable way to manage Laravel Cloud infrastructure without leaving the terminal. It ships with sensible defaults for quick setup and fits naturally into the way developers already work: spin up feature branch environments, manage hibernation schedules, and version-control infrastructure configurations.
The concrete capability list: create and manage applications, environments, databases, caches, object storage, domains, and more — all from the terminal.
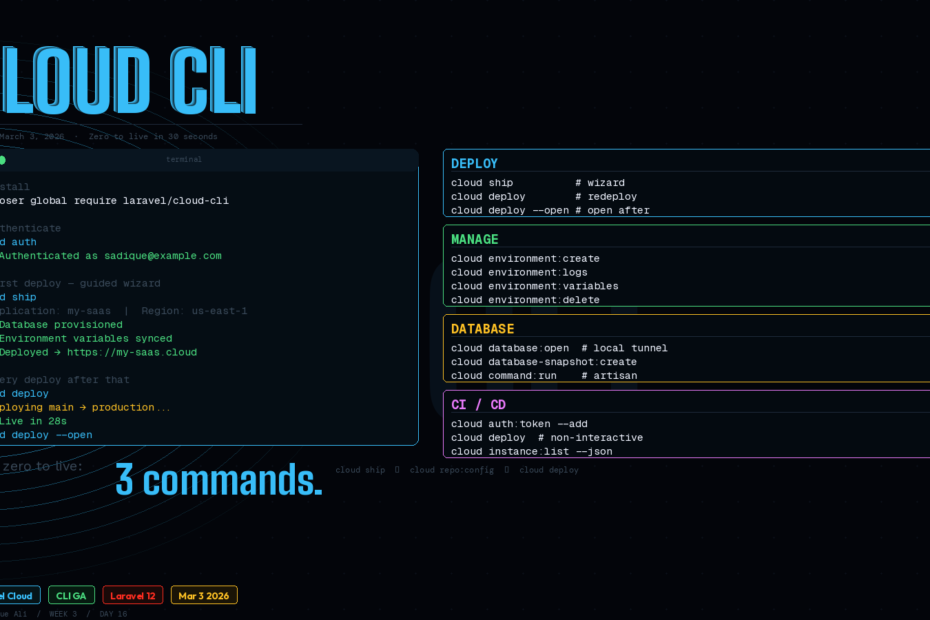
Install in One Command
Requirements: PHP 8.2+, Composer, Git. The GitHub CLI (gh) is optional but recommended — the ship command uses it to create a GitHub repository if your project doesn’t already have one.
composer global require laravel/cloud-cli
Make sure your global Composer vendor binaries are in your $PATH. On macOS this is typically ~/.composer/vendor/bin or ~/.config/composer/vendor/bin. Add to your ~/.zshrc or ~/.bashrc:
export PATH="$HOME/.composer/vendor/bin:$PATH"
Then verify:
cloud --version
Tab completions — install once, saves time forever:
cloud completions zsh # or bash, fish
Authenticate
Two methods depending on your context:
Browser OAuth (Interactive — Use This Locally)
cloud auth
Opens your browser, asks you to authorise the CLI, stores the token at ~/.config/cloud/config.json. Done.
Token Authentication (CI/CD — Use This in Pipelines)
# Add a named token for CI
cloud auth:token --add

# List tokens (verify what's stored)
cloud auth:token --list

# Remove a token
cloud auth:token --remove
For GitHub Actions, store the token as a secret and pass it via environment variable — more on this in the CI/CD section below.
Your First Deployment: cloud ship
The fastest path from zero to live. From inside your Laravel project directory:
cloud ship
This guided flow walks you through creating an application, configuring your environment, and deploying — all in a single command. It detects your repository, prompts for a region and application name, and optionally syncs your .env variables, creates databases or caches, and configures features like the scheduler, Octane, or WebSockets.
cloud ship is the “I want to go from a fresh project to a running production app” command. It handles everything interactively — you answer prompts, it provisions resources, and your app is live.
Day-to-Day: cloud deploy
For every subsequent deployment after the initial ship:
cloud deploy
The CLI resolves the target application and environment automatically using your repository configuration. After the deployment starts, the CLI monitors its progress and reports the result in real time.
# Deploy and open the app immediately on success
cloud deploy --open

# Monitor an active deployment (useful from a second terminal)
cloud deploy:monitor
Lock In Your Defaults: cloud repo:config
Run this once per project and never specify application/environment flags again:
cloud repo:config
This creates a .cloud/config.json file in your project root that stores the application_id and organization_id. Subsequent commands will use these defaults automatically.
Commit .cloud/config.json to your repository. Every team member who pulls the repo gets the correct defaults automatically — no configuration drift, no “which application is this?” confusion.
Managing Environments
# List all environments for your application
cloud environment:list

# Create a new environment (e.g. for a feature branch)
cloud environment:create

# View environment-specific logs
cloud environment:logs

# Update environment variables — interactive or via flags
cloud environment:variables
cloud environment:variables --json --action=set --key=STRIPE_SECRET --value=sk_live_...

# Tear down a feature branch environment when the PR merges
cloud environment:delete
The --json flag on environment:variables is what makes scripting reliable — machine-readable output means you can parse it in shell scripts or CI pipelines without screen-scraping.
Managing All Other Resources
Databases
# Create a database cluster
cloud database-cluster:create

# List databases in a cluster
cloud database:list

# Open a local connection to your cloud database
cloud database:open

# Take a manual snapshot before a risky migration
cloud database-snapshot:create

# Restore from a snapshot if things go wrong
cloud database-restore:create
cloud database:open is one of the most useful commands in the entire CLI — it opens a local tunnel to your cloud database without you manually configuring SSH tunnels or whitelisting IPs.
Caches, Buckets, Domains
cloud cache:create          # provision a Redis cache
cloud bucket:create         # create object storage bucket
cloud bucket-key:create     # generate access keys for the bucket
cloud domain:create         # add a custom domain
cloud domain:verify         # trigger DNS verification
Run Artisan Commands Remotely
cloud command:run
# Prompts for the command — e.g. migrate, db:seed, cache:clear
This replaces SSH + manual artisan calls. Run migrations post-deploy, clear caches, seed test data — all from your terminal without touching a server.
CI/CD Integration
The --json flag and non-interactive mode make the CLI a first-class CI/CD citizen. In non-interactive environments (GitHub Actions, CircleCI, etc.), interactive prompts are automatically disabled.
Here’s a complete GitHub Actions workflow:
# .github/workflows/deploy.yml
name: Deploy to Laravel Cloud

on:
  push:
    branches: [main]

jobs:
  deploy:
    runs-on: ubuntu-latest

    steps:
      - uses: actions/checkout@v4

      - name: Set up PHP
        uses: shivammathur/setup-php@v2
        with:
          php-version: '8.3'

      - name: Install Laravel Cloud CLI
        run: composer global require laravel/cloud-cli

      - name: Authenticate
        run: cloud auth:token --add
        env:
          CLOUD_API_TOKEN: ${{ secrets.LARAVEL_CLOUD_TOKEN }}

      - name: Deploy
        run: cloud deploy

      - name: Verify deployment
        run: cloud deploy:monitor
For feature branch environments, add a second workflow that creates an environment on PR open and tears it down on PR close:
# Create environment when PR opens
on:
  pull_request:
    types: [opened]

steps:
  - name: Create preview environment
    run: |
      cloud environment:create --name "pr-${{ github.event.number }}"
      cloud deploy

# Delete environment when PR closes
on:
  pull_request:
    types: [closed]

steps:
  - name: Tear down preview environment
    run: cloud environment:delete --name "pr-${{ github.event.number }}"
Ephemeral preview environments per PR — every pull request gets its own live URL, torn down automatically when the PR merges.
The AI Agent Angle
This is the part that makes Laravel Cloud CLI genuinely different from Forge or Vapor. Because Laravel Cloud is now accessible via the API, agents can interact with your infrastructure directly and provision databases, check instance counts, query hibernation status, and anything else available through the API.
In practical terms: you can now instruct Claude Code (or any MCP-compatible agent) to deploy your application, check deployment status, scale instances, or manage environment variables — without leaving your conversation.
# In Claude Code
"Deploy the main branch to production and tell me when it's done."
"Check how many instances are running in the production environment."
"Add STRIPE_WEBHOOK_SECRET to the production environment variables."
It’s designed to fit into the tools and workflows you already use: trigger deployments from GitHub Actions, script environment teardowns after a PR merges, or check deployment status from an AI agent.
The infrastructure becomes conversational. That’s a meaningfully different model from clicking through a dashboard — and it’s available today.
Useful One-Liners to Know
# Open the Laravel Cloud dashboard for this project
cloud dashboard

# Open the live application in your browser
cloud browser

# Get Laravel Cloud IP addresses by region (for firewall rules)
cloud ip:addresses

# Get JSON output for any command (for scripting)
cloud instance:list --json
cloud environment:variables --json
Cloud CLI vs Forge vs Vapor
| Factor | Laravel Cloud CLI | Forge | Vapor |
|---|---|---|---|
| Infrastructure ownership | Managed by Laravel | Your servers | AWS Lambda |
| Deployment command | cloud deploy | Push to branch or Forge UI | vapor deploy |
| Ephemeral environments | Yes — environment:create/delete | No | Yes |
| AI agent access | Yes — REST API | No | No |
| Database tunneling | cloud database:open | SSH tunnel | No |
| Remote artisan | cloud command:run | Forge UI or SSH | vapor command |
| CI/CD token auth | Yes — cloud auth:token | Yes | Yes |
The key differentiator is the combination: managed infrastructure (no server admin) + full CLI programmability + AI agent access. Forge gives you CLI + full server control but requires server management. Vapor gives you serverless scale but AWS complexity and no terminal-first workflow.
The Bigger Picture
The result is less manual work, consistent configurations across environments, and more infrastructure managed with the same team size.
That last point — same team size — is what makes this significant beyond the convenience angle. A solo developer with the Cloud CLI can now manage production deployments, ephemeral preview environments, database operations, and scaling — from a single tool, scriptably, with AI assistance. The operational overhead that used to require a DevOps engineer is now accessible to every Laravel developer.
The CLI went GA three days ago. The documentation is solid, the command set is comprehensive, and it’s available to all Laravel Cloud users today.
Follow me for daily deep-dives on Laravel, PHP, Vue.js, and AI integrations. New article every day.