WebAuthn is now native in Laravel 13 starter kits and Fortify. Face ID, fingerprint, hardware keys — no third-party packages, no stored passwords, no phishing surface. Here’s everything from how it works to full production setup.
Passwords are a bad deal for everyone.
For users: they’re reused across services, forgotten constantly, typed into phishing pages, and breached in bulk. For developers: they mean bcrypt storage, reset flows, security policies, breach monitoring, and the constant weight of “we’re responsible for protecting these.” The security model asks both sides to compensate for a fundamentally flawed system.
Passkeys — the WebAuthn-based passwordless authentication standard backed by Apple, Google, Microsoft, and every major browser vendor — replace that deal with a better one. Private keys stay on the device. Your server stores only a public key. Authentication is a cryptographic challenge-response that’s phishing-proof by design.
Laravel 13, released March 17, 2026, ships passkeys natively. They’re integrated into Fortify and scaffolded automatically in the new starter kits. No third-party packages required.
This is the complete guide: how passkeys work, the two ceremonies, setup on new apps, setup on existing apps, the frontend, the security model, and the honest edge cases.
How Passkeys Actually Work: Two Ceremonies
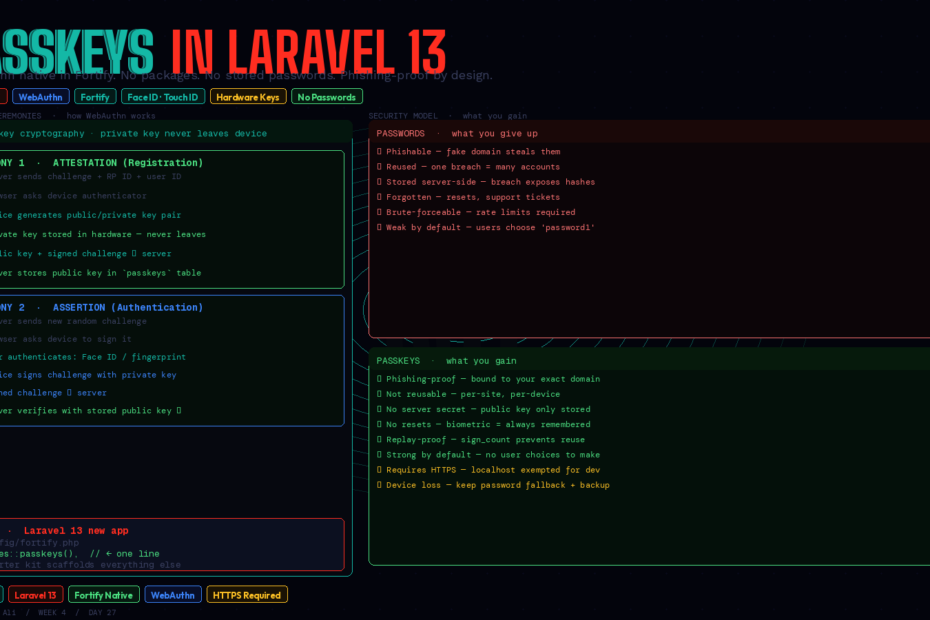
Before any code, it’s worth having a clear mental model. Passkeys involve exactly two operations, called “ceremonies” in the WebAuthn spec.
Ceremony 1: Attestation (Registration)
When a user sets up a passkey:
- Your server generates a random challenge and sends it to the browser along with your Relying Party ID (your domain) and the user’s ID
- The browser asks the device’s authenticator — TouchID, FaceID, Windows Hello, a YubiKey — to generate a public/private key pair
- The private key is stored inside the authenticator hardware and never leaves the device
- The device signs the challenge with the private key and sends back the public key + signed challenge
- Your server verifies the signature, stores the public key in your database, and associates it with the user
That’s it. No password. No secret stored server-side. The most sensitive thing in your database is a public key — useless without the corresponding private key that lives in the hardware.
Ceremony 2: Assertion (Authentication)
When a user logs in:
- Your server generates a new random challenge
- The browser asks the authenticator to sign the challenge with the stored private key
- The user authenticates biometrically (face, fingerprint) or with their device PIN to authorise the signing
- The signed challenge is sent to your server
- Your server verifies the signature using the stored public key — if it matches, the user is authenticated
The private key never leaves the device. The challenge changes every time. Phishing fails because the Relying Party ID (your domain) is cryptographically bound to the credentials — a fake bank-login.evil.com can never use a passkey registered for bank.com.
Path 1: New Laravel 13 App — Passkeys Out of the Box
If you’re starting a new application, passkeys are scaffolded automatically when you use a Laravel 13 starter kit.
Using the Vue/React/Livewire starter kits
laravel new my-app
# Choose: Vue, React, or Livewire starter kit
# Passkey support is included in the scaffold
The starter kit generates:
- A
passkeysdatabase table (migration included) - A
passkeysrelationship on theUsermodel - Fortify registration and authentication routes for passkeys
- Frontend components for passkey registration and login
- A “Security” settings page where authenticated users manage their passkeys
Enable the feature in config/fortify.php:
use Laravel\Fortify\Features;

'features' => [
    Features::registration(),
    Features::resetPasswords(),
    Features::emailVerification(),
    Features::twoFactorAuthentication([
        'confirm'         => true,
        'confirmPassword' => true,
    ]),
    Features::passkeys(),  // ← add this
],
That’s all that’s needed for a fresh app. The starter kit handles the rest.
Using the WorkOS starter kit (the zero-password path)
The WorkOS-powered starter kit goes further — it supports passkeys, social login, Magic Auth (email link), and SSO, and is designed to let you disable email/password authentication entirely:
laravel new my-app --using=workos
When using WorkOS, disable email/password in the WorkOS AuthKit dashboard and let users authenticate exclusively via passkeys, social providers, or Magic Auth. Your application never handles a password at all.
Path 2: Existing Laravel App — Adding Passkeys
For apps already in production, the cleanest path is Spatie’s laravel-passkeys package, which integrates with Fortify and provides Livewire components.
Install
composer require spatie/laravel-passkeys
php artisan vendor:publish --provider="Spatie\LaravelPasskeys\PasskeysServiceProvider"
php artisan migrate
The migration creates a passkeys table:
passkeys
├── id
├── user_id (foreign key → users)
├── name         (user-friendly label: "MacBook Pro", "iPhone 15")
├── credential_id
├── public_key
├── sign_count   (replay attack prevention)
└── timestamps
Add the relationship to your User model
use Spatie\LaravelPasskeys\Models\Concerns\HasPasskeys;

class User extends Authenticatable
{
    use HasPasskeys;
    // Adds: $user->passkeys() HasMany relationship
}
Configure the relying party
# .env
PASSKEYS_RELYING_PARTY_NAME="My SaaS"
PASSKEYS_RELYING_PARTY_ID="myapp.com"
PASSKEYS_RELYING_PARTY_URL="https://myapp.com"
The Relying Party ID must be your exact domain (no protocol, no port). Passkeys registered for myapp.com will not work on staging.myapp.com. Plan your subdomain strategy accordingly.
Register the Fortify authentication pipeline
// app/Providers/FortifyServiceProvider.php
use Spatie\LaravelPasskeys\Actions\AuthenticateUserUsingPasskey;

public function boot(): void
{
    Fortify::authenticateUsing(function (Request $request) {
        // Try passkey authentication first
        if ($request->has('credential')) {
            return app(AuthenticateUserUsingPasskey::class)($request);
        }

        // Fall back to email/password
        $user = User::where('email', $request->email)->first();
        if ($user && Hash::check($request->password, $user->password)) {
            return $user;
        }
    });
}
The Frontend: Two Routes, Two JavaScript Calls
Passkeys require two API endpoints (provided by Fortify or your package) and corresponding JavaScript using the browser’s WebAuthn API. In practice, you use @simplewebauthn/browser to abstract the raw API:
npm install @simplewebauthn/browser
Registration flow (Livewire component)
// app/Livewire/PasskeyManager.php
class PasskeyManager extends Component
{
    public string $passkeyName = '';

    public function registerPasskey(): void
    {
        // Step 1: Get registration options from server
        // Step 2: Browser prompts device for biometric/PIN
        // Step 3: Send attestation response back to server
        // (The Spatie Livewire component handles this entirely)
        $this->dispatch('register-passkey', [
            'name' => $this->passkeyName,
        ]);
    }

    public function render(): View
    {
        return view('livewire.passkey-manager', [
            'passkeys' => auth()->user()->passkeys,
        ]);
    }
}
{{-- resources/views/livewire/passkey-manager.blade.php --}}
<div>
    <h2>Your Passkeys</h2>

    @foreach ($passkeys as $passkey)
        <div class="flex items-center justify-between p-4 border rounded">
            <div>
                <p class="font-medium">{{ $passkey->name }}</p>
                <p class="text-sm text-gray-500">Added {{ $passkey->created_at->diffForHumans() }}</p>
            </div>
            <button wire:click="deletePasskey({{ $passkey->id }})"
                    class="text-red-600 hover:text-red-800">
                Remove
            </button>
        </div>
    @endforeach

    <div class="mt-4">
        <input wire:model="passkeyName"
               type="text"
               placeholder="Name this device (e.g. 'MacBook Pro')"
               class="border rounded px-3 py-2" />
        <button wire:click="registerPasskey"
                class="ml-2 bg-blue-600 text-white px-4 py-2 rounded">
            Add Passkey
        </button>
    </div>
</div>
Login flow (Alpine.js)
{{-- resources/views/auth/login.blade.php --}}
<div x-data="passkeyLogin()">
    <button @click="loginWithPasskey()"
            class="w-full flex items-center justify-center gap-3 border rounded-lg px-4 py-3 hover:bg-gray-50">
        <svg><!-- fingerprint icon --></svg>
        Sign in with passkey
    </button>

    <div class="relative my-4">
        <div class="absolute inset-0 flex items-center">
            <span class="w-full border-t"></span>
        </div>
        <div class="relative flex justify-center text-sm">
            <span class="bg-white px-2 text-gray-500">or</span>
        </div>
    </div>

    {{-- Traditional email/password form below --}}
</div>

<script>
function passkeyLogin() {
    return {
        async loginWithPasskey() {
            const { startAuthentication } = await import('@simplewebauthn/browser')

            // Get assertion options from server
            const optionsResponse = await fetch('/auth/passkey/options', {
                method: 'POST',
                headers: { 'Content-Type': 'application/json', 'X-CSRF-TOKEN': '{{ csrf_token() }}' },
            })
            const options = await optionsResponse.json()

            // Prompt device for biometric/PIN
            const assertion = await startAuthentication(options)

            // Send back to server for verification
            const verifyResponse = await fetch('/auth/passkey/authenticate', {
                method: 'POST',
                headers: { 'Content-Type': 'application/json', 'X-CSRF-TOKEN': '{{ csrf_token() }}' },
                body: JSON.stringify(assertion),
            })

            if (verifyResponse.ok) {
                window.location.href = '/dashboard'
            }
        }
    }
}
</script>
Security Model: What You Get For Free
Passkeys don’t just replace a password. They change the security properties of your authentication system entirely:
Phishing-resistant by design. The credential is cryptographically bound to your Relying Party ID (your domain). A fake myapp-login.com gets nothing — the browser won’t use a passkey registered for myapp.com on a different domain.
No server-side secret. The worst-case database breach exposes public keys. Public keys are, by definition, not secret. An attacker with your entire database still can’t authenticate as any user without physical access to their device.
No credential stuffing. Passwords leaked from one site are tried against others at scale. Passkeys are per-site, per-device. There is no credential to stuff.
Replay attacks prevented. The sign_count field in your passkeys table increments on every successful authentication. If a count arrives that’s lower than the stored value, the authentication is rejected — someone replayed an old assertion.
Biometric data stays on device. Face ID and fingerprint data never leave the device. Apple, Google, and Windows Hello don’t send biometric data to any server. Your app only sees the signed challenge.
The Edge Cases Worth Planning For
Device loss. If a user loses their only device and has no other registered passkeys, they can’t log in. The solution: always keep email/password (or email magic link) as a fallback, and encourage users to register passkeys on multiple devices. Add a clear “lost device” recovery flow.
Corporate devices. Some corporate IT environments restrict biometric authentication or hardware key usage. Plan for the fallback.
HTTPS is required. WebAuthn does not work over plain HTTP. In development, use localhost (browsers exempt it) or set up a local HTTPS cert with mkcert. In production, this is not negotiable.
Passkey sync vs device-bound. iCloud Keychain, Google Password Manager, and Windows sync passkeys across a user’s devices automatically. A passkey registered on an iPhone is available on iPad and Mac via iCloud. Hardware security keys (YubiKey) are device-bound. Both are valid; the UX implication is that syncing passkeys are more convenient but hardware keys offer stronger security guarantees for high-assurance apps.
Browser support. Chrome 108+, Safari 16+, Firefox 122+, Edge 108+. All modern browsers. Internet Explorer is not a browser.
Passwords + Passkeys: The Transition Strategy
You don’t have to choose on day one. The recommended migration path:
- Add passkeys as an option alongside email/password. Let users opt in. Show the “Sign in with passkey” button on login, passkey management in settings.
- Prompt users to register a passkey after their first successful password login. A nudge, not a force.
- Track adoption. Monitor what percentage of your active users have a registered passkey.
- Make passwords optional once passkey adoption is high. Users with at least one registered passkey can have their password disabled on request.
- Sunset passwords when you’re confident. Some enterprise apps will never reach this stage — that’s fine. The goal is offering the better option, not forcing a migration.
The Bigger Picture
Passkeys are the single biggest improvement to web authentication in two decades. They’re not a niche feature — Apple built it into every device, Google made it the default in Chrome, Microsoft added it to Windows Hello. The infrastructure is already on your users’ devices.
What was missing was native framework support. Before Laravel 13, adding passkeys meant either a third-party package with its own setup story or building the WebAuthn flows from scratch. Neither option suited teams who wanted to ship, not configure.
Passkeys are now integrated into Laravel’s starter kits and Fortify — a Features::passkeys() flag and a database migration. That’s the whole story for new applications.
The password era isn’t over tomorrow. But the path away from it is now clear, well-lit, and built into the framework you’re already using. That’s what matters.
Follow for daily deep-dives on Laravel, PHP, Vue.js, and AI integrations. New article every day.